| Controlled Awakening | |
|---|---|
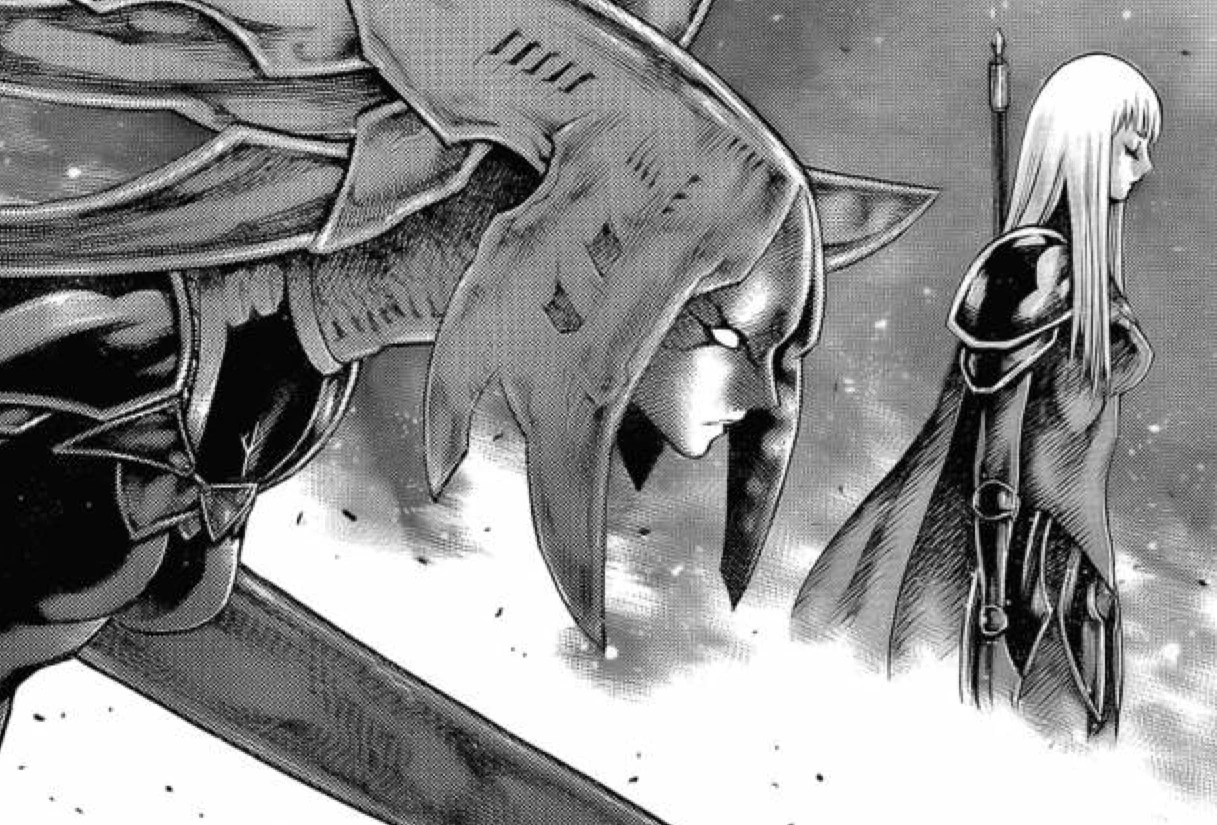 Twins using Controlled Awakening | |
|
VIZ Media name |
N/A |
|
Variant |
N/A |
|
Original name |
完全精神共有による、覚醒の完全制御[1] Kanzen seishin kyōyū niyoru, kakusei no kanzen seigyo |
|
Class |
Special:[2] Mind Share/Full Release[3] and Mind Share/Full Control[4] |
|
Description |
Attack target using Mind Share/Full Release and Mind Share/Full Control |
|
Current status |
Unknown |
|
User |
Alicia, Beth |
|
Associated technique |
Unknown |
|
Quote |
They have almost no individual self.[5] |
|
First appearance |
|
Etymology[]
Unofficial translation. Unused by characters.
"Controlled Awakening" is an abridgement of 完全精神共有による、覚醒の完全制御,[6] which can be translated as "Mind Share—Full Control of Full Awakening."
Literal translation: 完全 = full. 精神 = mind. 共有 = shared. による = with. 覚醒 = awakening. の = of. 完全 = full. 制御 = control.
"Soul Link" is a scanlator invention unused by all official translations. "Soul Link" refers collectively to the abilities of Mind Share/Full Release and Mind Share/Full Control, rather than the combined technique of Controlled Awakening.
Alicia's and Beth's datasheets name the technique in Yoma War Record III.[7]
Description[]
Mind Share/Full Release and Mind Share/Full Control enable this technique: Full Release partner releases Yoma power at 100%, while fully releasing consciousness into Full Control partner, who remote controls awakened partner's actions.
Foundation[]
- Identical twin babies
- Must have innate (born) ability
- Same Yoma tissue
Training[]
- Phase 1: twins totally align Yoma power and action from infancy.
- Phase 2: twins taught to share same mind and its attributes.
- Phase 3: Full Release partner releases Yoma power at 100%, as well as consciousness into Full Control partner. Full Control partner turns off her own Yoma power completely, while controlling Full Release partner actions.
History[]
First attempt[]
Experiment with warriors No. 1 and 2—Luciela and Rafaela—ends in disaster. Organization nearly destroyed.[9]
VIZ Media translation has Dae describe the sisters' Controlled Awakening experiment as "Yoma power harmonization," the same phrase as Rafutera's technique.[10]
When Rafaela is exiled, the Organization begins collection and training of identical twins on the island. Most candidates end in failure.
Alicia and Beth[]
Years later, the Organization succeeds with Alicia and Beth.
Alfons[]
Battle of the North serves as delaying tactic, buying time till Alicia and Beth perfect Controlled Awakening.[11] After the Organization's defeat at Pieta, Northern Army splits in two—12 Awakened heading for Lautrec, 11 for Sutafu.[12]
Sutafu[]
As Northern Army approaches Organization Headquarters, Alicia and Beth—in black Uniforms—confront army.[13]
Apparent leader, Lobster awakened, challenges twins.
Galatea and Rubel watch Alicia awaken into winged form, while Beth appears to meditate. Galatea speculates that the twins share one mind.[14]
Rubel confirms her suspicions, explaining how the twins were trained from infancy to be of one mind—in short, a two-person Claymore warrior. Neither twin has any individuality left.[15]
Lautrec[]
On news of Isley's death in Mucha, Limt sends Alicia and Beth to kill Riful.[16]
Round I[]
Hunters[]
As Riful and Dauf observes Destroyer, Abyss Feeders attack. Then Alicia and Beth land before them. They announce themselves as "Abyss Hunters," to Riful's amusement.[17]
Alicia awakens and proceeds to shred both Riful and Dauf.[18]
Together with Abyss Feeders, the twins begin defeating Riful and Dauf. During the 3-way battle, the Destroyer fires rods, hitting all three parties.[19][20]
Escape[]
Riful drags Dauf from battlefield. Abyss Feeders ambush her. Suddenly, Alicia's awakened form attacks the Abyss Feeders. The wayward attacks confuse Riful.[21]
No control[]
Unknown to Riful, a parasitic Rod has penetrated Beth, sitting unconscious.[22]
Round II[]
Discovery[]
Cynthia and Yuma find Beth. Yuma wants to help, but Cynthia holds her back. Both Beth and rod merge into an Awakened.[23]
Alicia[]
Alicia, reverted to her human form, cut off Riful's arm and leg with her sword. Alicia stops fighting and awakens.[24]
Round III[]
Priscilla[]
The awakened Beth and Priscilla meet. They fight, but Priscilla loses interest and walks away.[25]
Last charge[]
Alicia, facing Riful and Dauf, suddenly leaves. She joins Beth in her battle with Priscilla. The twins have both awakened.[26]
Priscilla beheads Alicia. Weeping, Beth charges Priscilla.[27]
Twin Trainees[]
The Twin Trainees display similar techniques, but are able to switch the awakened and control roles.[28]
References[]
Tankōbon Claymore volumes cited are VIZ Media (en-us) editions, unless otherwise noted. Manga scenes (chapters) not yet translated cite Shueisha tankōbon (ja) editions. Manga scenes not yet published in tankōbon form cite Jump SQ (ja) editions. Fragments of Silver Omnibus (総集編 銀の断章 Gin no Danshou) 1–3, Shueisha, are only available in Japanese. Anime scenes (episodes) cited are FUNimation (en-us) editions, unless otherwise noted.
- ↑ Fragments of Silver Omnibus 3, "Yoma War Record III," p. 729
- ↑ Fragments of Silver Omnibus 3, "Yoma War Record III," p. 729
- ↑ Fragments of Silver Omnibus 3, "Yoma War Record III," p. 729
- ↑ Fragments of Silver Omnibus 3, "Yoma War Record III," p. 729
- ↑ Claymore 11, Scene 62, p. 145
- ↑ Fragments of Silver Omnibus 3, "Yoma War Record III," p. 729
- ↑ Fragments of Silver Omnibus 3, "Yoma War Record III," p. 729
- ↑ Fragments of Silver Omnibus 3, "Yoma War Record ,III" p. 721
- ↑ Claymore 12, Scene 64, p. 9
- ↑ Claymore 20, Scene 110, p. 81
- ↑ Claymore 11, Scene 61, p. 103
- ↑ Claymore 11, Scene 62, p. 128
- ↑ Claymore 11, Scene 62, pp. 134–135
- ↑ Claymore 11, Scene 62, pp. 138–144
- ↑ Claymore 11, Scene 62, p. 144
- ↑ Claymore 16, Scene 89, pp. 188–189
- ↑ Claymore 17, Scene 93, p. 127
- ↑ Claymore 17, Scene 94, pp. 129–136
- ↑ Claymore 17, Scene 94, pp. 150–153
- ↑ Claymore 17, Scene 95, p. 190
- ↑ Claymore 17, Scene 95, pp. 179–188
- ↑ Claymore 17, Scene 95, p. 190
- ↑ Claymore 18, Scene 96, pp. 19–25
- ↑ Claymore 18, Scene 97, pp. 47–53
- ↑ Claymore 18, Scene 97, pp. 54–64
- ↑ Claymore 18, Scene 98, p. 82
- ↑ Claymore 18, Scene 98, p. 100
- ↑ Claymore 19, Scene 106, p. 152–156