| Galatea | |
|---|---|
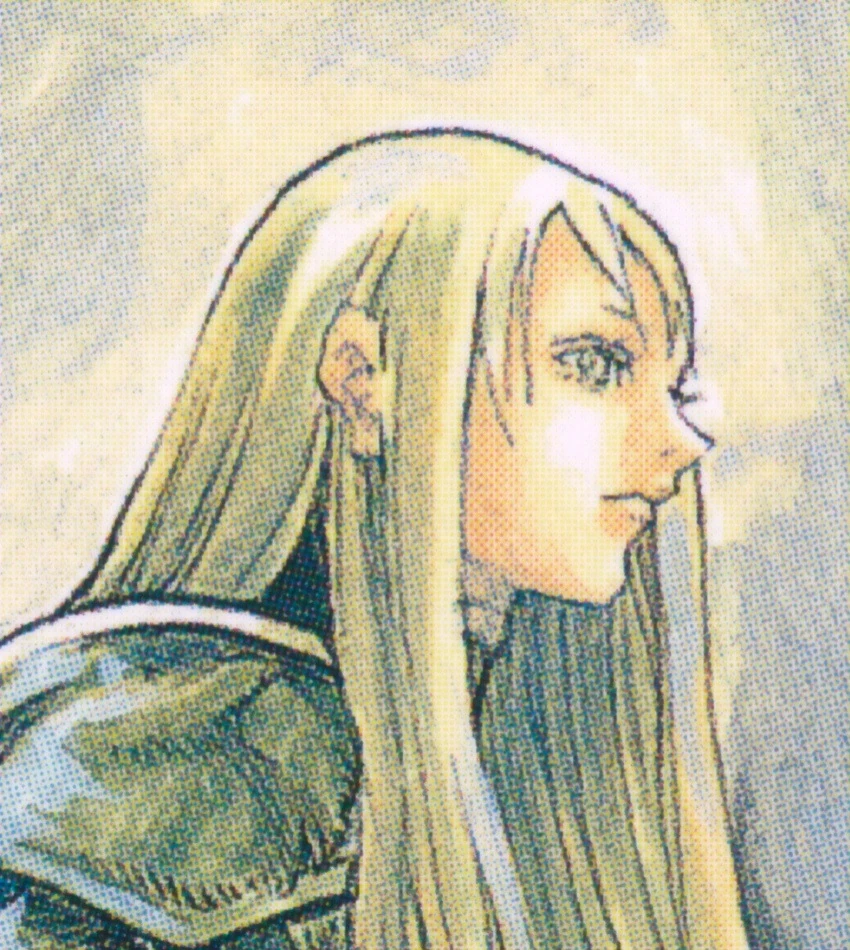 Galatea from Memorabilia
| |
|
VIZ Media name |
Galatea[1] |
|
Variant |
Name: Galatea[2][3][4] (de |
|
Original name |
ガラテア[16] Garatea |
|
Rank No. |
3 of the Current Generation[17] |
|
Current status |
Alive, deserted |
|
Ties |
Organization, Church of Rabona, Ghosts |
|
Class |
Defensive:[18] 広域感知[19] Kōiki Kanchi |
|
Technique |
妖気同調と操作[21] Yōki Dōchō to Sōsa |
|
Quote |
It seems you forget everything as soon as you hear it.[22] |
|
Anime voice |
Katharina Koschny (de), |
|
First appearance |
|
Etymology
Primary meanings
The original Japanese Claymore name, ガラテア, transliterates from "Galatea," deriving from either the Greek Γαλατια (she who is milk-white) or Γαλατεια (the goddess of calm seas).[23]
May allude to a pureness of spirit (compare to Deneve) or inner calm (compare to Ilena), both are descriptive of the Claymore Galatea.
FUNimation anime pronounces the name as ga-lah-TAY-uh, an amalgam of the English and Japanese pronunciations.
Secondary meanings
In Greek-Roman mythology, "Galatea" can also be a sea-nymph in Homer's Iliad. Or the 18th century name of the originally nameless statue that Pygmalion fell in love with. Answering his prayers, a goddess brought the statue to life as "Galatea." Neither of these relate to the Claymore character.
Nickname
The moniker 神眼 Kami me (God-eyes) does not appear on Galatea's datasheet in Yoma War Record II.[24] Miria first uses it in the Genesis of War arc,[25] which possibly refers to Galatea's religious dress and locale. The furigana しんがん shin gan (truth or falsehood) superscripted over "God-eyes" may allude to Galatea's ability of perceive the real situation, despite the target's best efforts to conceal one thoughts, identity or presence.
In Scene 138, Galatea's name appears as furigana superscripted over "God-eyes" (神眼) in the narration,[26] confirming "God-eyes" as a moniker.
Appearance
Claymore warrior
Physical
Elongated, heart-shaped face, framed with "Rapunzel hair"—waist-long with fringe on forehead. Her expression is often unreadable, leaving others to guess her thoughts. Much taller than average. Bears a strong physical resemblance to the mass media figure, Paris Hilton, though personalities differ.
Uniform
Wears a pincher-shaped buckle, holding 2-layer spaulders on the shoulders. Vambraces cover her forearms to the elbow.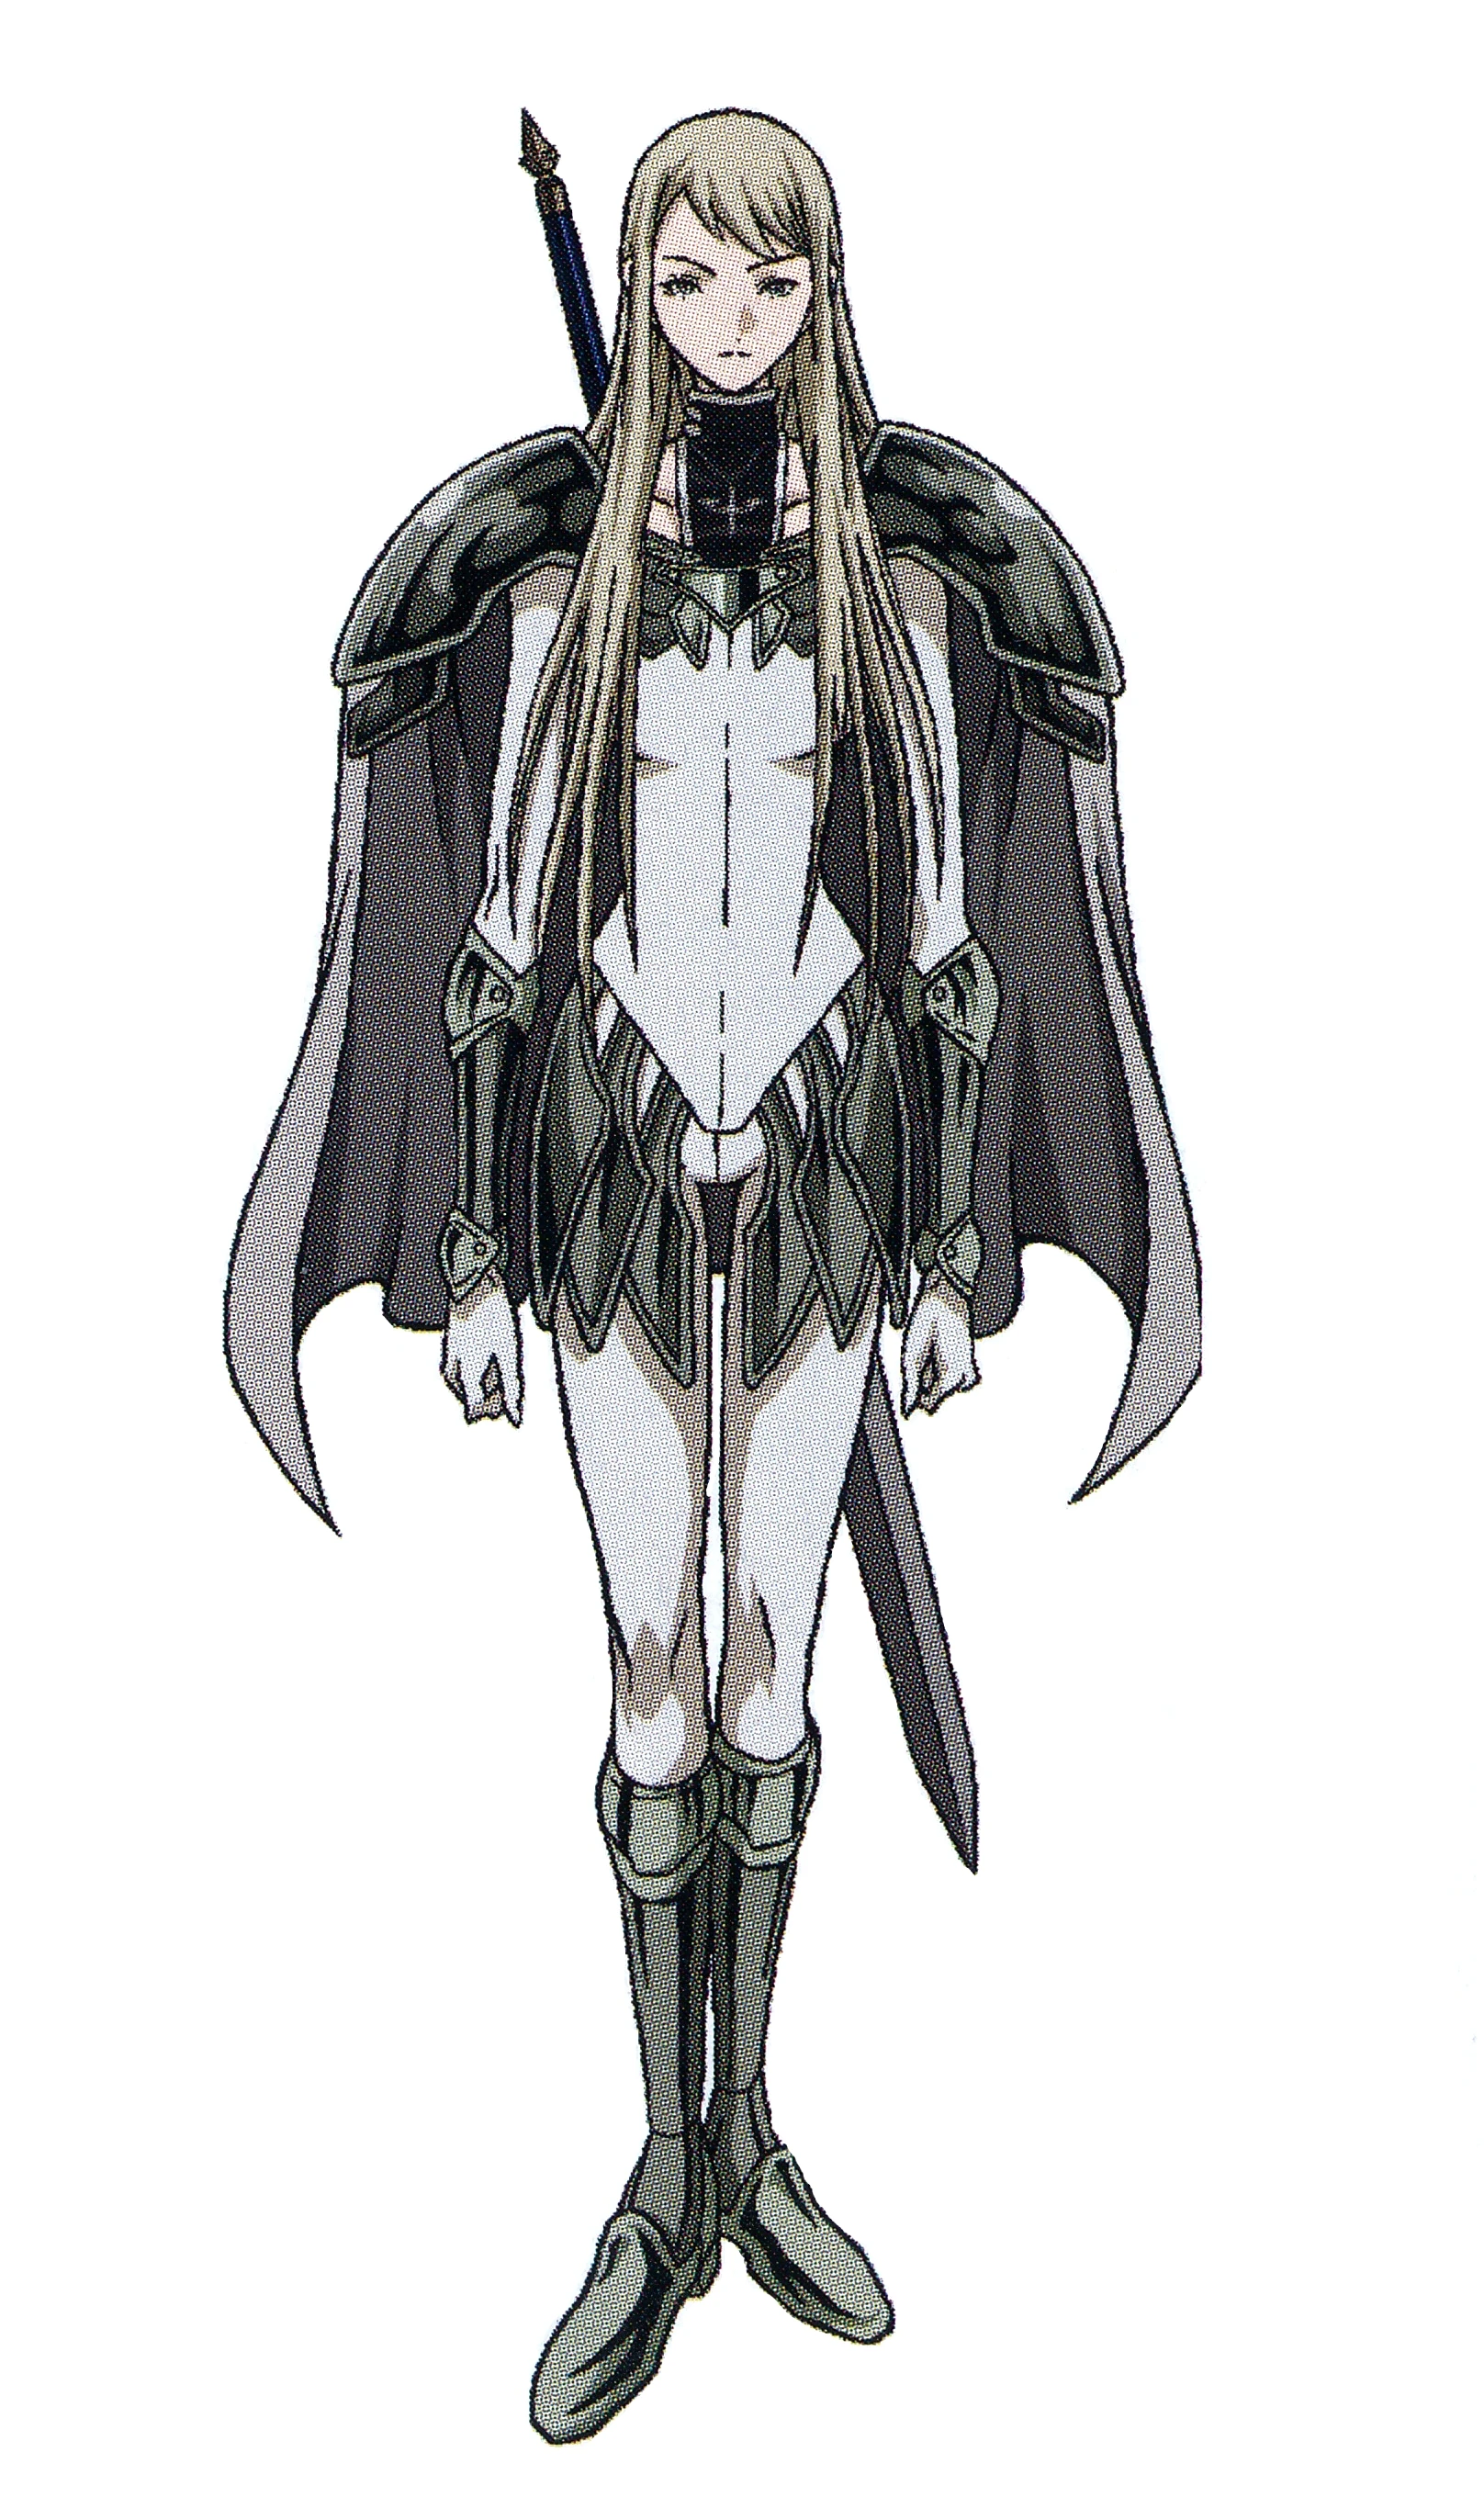
Galatea in uniform
Nun
Depending on the narrative, Galatea's eyes sometimes bears stylistic "scars" to depict blindness. Device sometimes mistaken for physical scars.
Her nun habit consists of a long blue-green dress, white wimple and a necklace bearing the Church of Rabona symbol. In addition, she wears white stockings and pumps. On the job as a nun she wears a veil.
Galatea resembles Sister Shannon Masters (1987), the protagonist of the Warrior Nun Areala graphic novel series.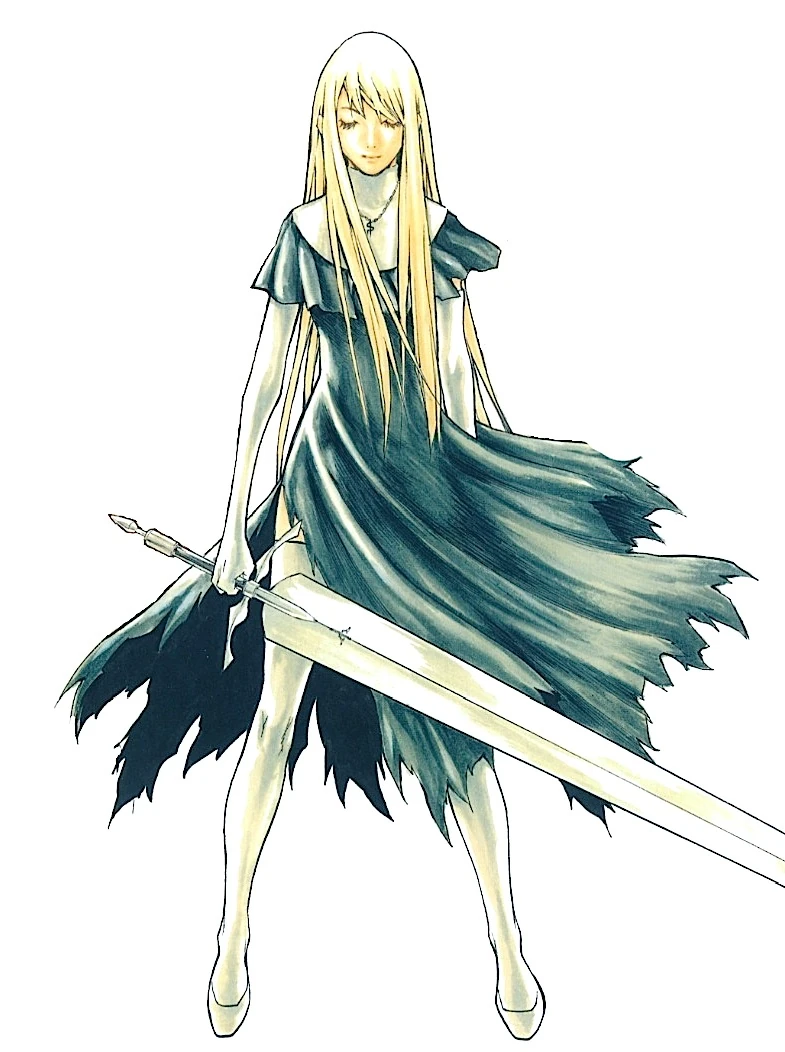
"Sister Latea" from Memorabilia
Personality
Well-mannered, aristocratic bearing. Basically kind, as her treatment of Clare after the Witch's Maw—and her Sister Latea role—demonstrates.
But Galatea's dialog can be witty. When Dietrich calls Galatea, "Galatea the Renegade"[27] (also "Traitor Galatea"), Galatea calls Dietrich 追跡者ディートリヒ[28] (Tracker Dietrich),[29] 追跡者 (stalker) also being Japanese for those who stalk others for sexual purposes, lampooning Dietrich's persistent stalking behavior.[30]
As a former No. 3 of the Current Generation, Galatea is currently holds the highest rank among the former Claymore warriors, preceding the Next Generation No. 3 Audrey. In Chaldean Numerology, the number 3 is traditionally lucky. In addition, a 3 is both witty and vivacious.
Datasheet
The Organization baselines and assessment are based on data before the 7-year timeskip.
Baseline
Height: 185cm (6ft .83in).[31] Dominant arm: right[32]
|
|
Class
Galatea is a defensive type warrior, her innate abilities being Wide Area Sensing and Alignment.[33]
Technique
Technique, if any, that uses Wide Area Sensing is unknown.
Alignment and control
Alignment ability enables Yoma Energy Alignment and Control.[34] Galatea can manipulate Yoma power in opponents, distorting their focus, changing the trajectories of their attacks.
Controlled awakening
During Europa's attack on Rabona, Galatea and Clarice together use Controlled Awakening with Miata, the three acting like Alicia and Beth.
Miata awakening
Despite that neither Galatea or Clarice are twin sisters of Miata, Controlled Awakening is made possible by Miata's innocence, her young mind unfettered with extraneous thoughts.[35] Galatea and Clarice fulfill the role of Mind Share/Full Control, while Miata fulfills Mind Share/Full Release.
Organization assessment
The Organization notes ability to sense and identify Yoma auras from great distances. Acts as the "Eyes" of the Organization. Can align own Yoma power with targets. Yoma power release rate unexcelled, despite being a defensive type. Punished for falsely reporting the deaths of Clare and Jean.[36]
History
Early life unknown.
Organization
Paburo mission
First appears on Paburo mission with Ermita in Paburo Mountains. Galatea remotely observes Paburo hunt. Confirms all four members survive. Ermita warns Galatea: "Someday you may have to cross swords with them."[37]
Zakol mission
During an Executive meeting between Limt and Rubel, Limt orders Ermita to find Clare.[38] Galatea is sent on Zakol mission.
Round I
In Zakol Mountains, Galatea locates Clare inside castle (Witch's Maw). Clare has been captured by Dauf.[39]
Round II
Using Yoma Energy Alignment and Control, Galatea makes Dauf drop Clare into her waiting arms. Galatea tries to leave. But Dauf caves-in entrance. But all his Yoma rods miss their target. In a counterattack, Galatea cuts off Dauf's hand.[40]

Galatea rescues Clare

Riful appears and couches Dauf on circumventing Galatea's technique.

During the combat, Riful says she needs the warriors to awaken, so they can join her army. The enemy is Isley of the North, inadvertently revealing Priscilla's existence.[41] When Clare demands to know Priscilla's whereabouts, Riful promises to tell if Clare can land one sword blow on her. Riful almost tricks Clare into awakening, but Galatea reverts her back.[42]
Galatea orders Clare to retrieve Jean, while she holds off Dauf.[43]
Round III
Clare discovers Jean awakened into butterfly form. Clare tries repeating Galatea's technique to revert Jean to normal.[44]
Upstairs, Galatea is exhausted, but Clare and Jean arrive. Galatea and Clare plan to distract Dauf, while Jean, using Drill Sword, bores through his throat. In the ensuing combat, Dauf slams Galatea and Clare together, then strikes down Jean, losing most his fingers.[45]
Round IV
Clare asks Jean to get up and try once more. This time, Clare's Quicksword prevents Dauf from slamming his arms together on the warriors.[46]
Jean bores through Dauf's throat. Riful stops Jean from beheading Dauf. Riful addresses Galatea and Clare: "You held me off and didn't break, despite my efforts." Then she rewards Galatea and Clare by giving back Jean.[47]
One translation has Riful speaking to Dauf instead: "Someone like you who can accept me without breaking." Mistranslation repeated in English dub of anime.
After Riful leaves, Galatea tries to return Clare to Organization, but Jean intervenes. Galatea gives up and says she will report Clare and Jean dead.[48] But later, Rafaela finds them. Rubel shocks Jean and Clare by pretending that Galatea was executed.[49]
Battle of the North
Manga and anime diverge here.
Manga
During an Executive meeting, Galatea confronts Limt over the fate of the battle group in Pieta.[50]
After the 7-year timeskip, Audrey tells Clare that Galatea deserted the Organization.[51]
Anime
In a desert, Rubel meets Galatea. He assigns her to the Alfons mission and observe the fighting.[52]

Rubel and Galatea
Up in Alfons, she meets Miria, Deneve and Helen, who are searching for Clare. Galatea points to the volcano.[53]
Later, in a Pieta church, when Rubel asks if Clare is still alive, Galatea falsely reports that Clare's Yoma aura is undetectable. She silently bids Clare farewell. Series ends for Galatea here.[54]
Alicia and Beth
As Northern Army approaches Organization Headquarters, identical twins in black uniforms—Alicia and Beth—confront army.[55]
Galatea and Rubel watch Alicia awaken into winged form, while Beth appears to meditate. Galatea speculates that "They share...one mind...?"[56]
Rubel reveals that Alicia and Beth have lost almost all individuality (almost no "self" or intellect), explaining how the twins were trained from infancy to be of one mind—in short, a 2-body Claymore warrior.[57]
Church of Rabona
In the manga, Galatea deserts the Organization. She blinds herself to reduce her Yoma aura. She joins the Church of Rabona as nun, using a fore-clipped version of her name—Sister Latea.
Operation Rabona II
Limt assigns Clarice and Miata to find and purge Galatea.
Mystery
Sid, after helping Clarice and Miata escape the city guards, takes them to a cemetery, where Galk's office is located. Galk says locals have disappeared and suspects a Yoma is responsible. Sid confirms that a woman of Galatea's description lives in town.[58]
Elsewhere, Galatea says farewell to orphans leaving a neighborhood church. And says farewell to a surprised Father Mohr. Clarice and Miata have arrive as expected.[59]
Complication
Galatea reveals that she released Yoma power, tricking the Organization into sending a purge team to Rabona. She hoped they would fight Agatha instead. But when Agatha appears as crab-like awakened being, Clarice and Miata ignore her and attack Galatea. 3-way fight develops as Galatea fights both them and Agatha.[60]
Galk leads a counterattack—a diversion. Sid climb on Agatha and attacks human appendage. But tentacles ensnare him. Galatea throws Galk to block Miata, while Galatea frees Sid. She then throws Sid to Clarice.[61]
When Miata does attack Agatha, tentacles ensnare Miata. Clarice runs away, only to reappear behind Agatha. Clarice escapes with Miata, critically wounded. Agatha defeats everyone. Holy City defenseless.[62]
Surprise visitors
Clare and Ghosts show up.[63] They immobilize Agatha by cutting off her legs.
Agatha is forced to abandon her crab form and contracts into mummy, with tape-like tentacles. As the Ghosts whittle down this false body, Agatha escapes in her true human form. She takes Galatea hostage. But Clare, per Galatea's suggestion, uses Quicksword to kill Agatha.[64]
Galatea offers to submit to execution. But Clarice and Miata desert Organization instead. Afterward, Miria relates her research on the Organization—Miria's theory.[65]
Miria puts Galatea in charge of Clarice and Miata. Later, Miria negotiates with Vincent in the cathedral, regarding Claymore status in the city.[66]
Later, Galatea speaks with Vincent about the stigma on Claymore warriors bodies. "That's the proof of us being half-human, half-Yoma. Because it shows that something resides in this body which should be avoided."[67]
Riful hunt
After a meeting of the Ghosts, Miria lets most of them leave for personal business.[68]
Later, Galatea senses Alicia and Beth speeding westward. Miria suspects their target is Riful. Dietrich confirms her suspicions. With Alicia and Beth preoccupied with the Riful hunt, the Organization's main defense is gone.[69]
Miria sees her opportunity. To prevent Tabitha from following, Miria wounds and paralyzes Tabitha. Then sets out alone for Organization Headquarters.[70]
When Tabitha regains consciousness, Galatea explains that Miria may kill humans for the first time. And that she did not want Tabitha involved.[71]
Revenge
After Miria's failed attempt to destroy Organization, awakened beings and Yoma invade Rabona. Galatea, Tabitha, Clarice and Miata defend city with guards. Arrival of the Ghosts finally defeats the invasion.[72]
Galatea suspects the Organization is behind the invasion.[73]
Cocoon
Later, the Ghosts bring back the Yoma cocoon to Rabona. While probing cocoon for Clare's presence, Galatea realizes that releasing Clare means releasing Priscilla.[74]
Return to Rabona
Empty city
After the Claymore Rebellion, the Ghosts return to free Clare before Cassandra's arrival. Inside the deserted city, they are greeted by a tearful Clarice, then Galatea, Galk and Sid. When Miria asks what happened, Galatea leads the Ghosts to the outskirts of town.[75]
Emergence
Priscilla
The awakened form of the unknown Priscilla is half-emerged from the cocoon. Deneve confirms this is the awakened that she saw in Lautrec.[76]
Miria now understands why Galatea had the city evacuated.[77]
Origami awakened
After Clare emerges from the cocoon, Miria fails to kill Priscilla. Instead, a combat between the Destroyer and Priscilla engulfs the awakened audience. Two awakeneds are thrown into Rabona.
Deneve and Co. confront one of them—the Origami awakened. Miata attacks and creates a massive wound, but Origami instantly regenerates. Deneve observes that only a single attack that destroys most of the body will work.[78]
Helen prepares for a Drill Sword attack. Before Origami can escape, Galatea uses Yoma Energy Alignment and Control to immobilize her. Helen's attack then destroys Origami.[79]
Europa
Next Generation
During the Ghosts' and Octavia's party's engagement against Cassandra, Europa suddenly leaves the battlefield, hunger overtaking her urge to fight Cassandra. Europa cannot resist the smell of human viscera coming from the Holy City of Rabona.[80]
Meanwhile on the ramparts of the city, Galatea senses Europa's approaching aura, whose magnitude is of a greater order than the two previous awakeneds that landed in town. Clarice asks what should they do.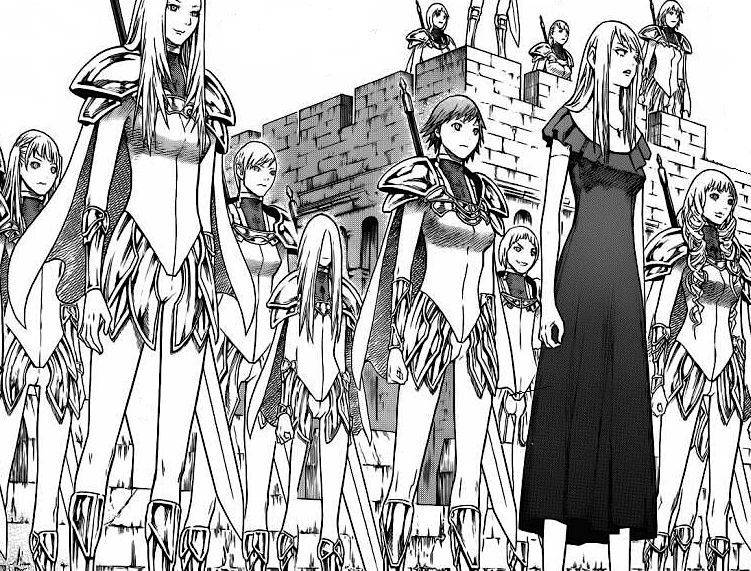
Next Generation warriors
The Next Generation warriors from Organization Headquarters are assembled behind them, which include Audrey, Miata, Rachel, Dietrich, Anastasia, Rafutera and Nike. Galatea announces that now is the time to defend their ground. [81]
Sky command
Standing before Galatea's command post high above the city, Dietrich remonstrates Galatea's on allowing humans to remain in Rabona. Galatea replies that the citizens have only left a few day ago. Whether they travel on horse or on foot, an awakened would catch up to them in an instant.
And as to Dietrich's assertion that the guards should have forcibly removed from the city, Galatea implies that the human guards remained here not to protect the physical city, but the fleeing citizens. The guards are here as human bait to lure any awakened away from the refugees.[82]
Dietrich mentions that both she and Galatea share the same period, group or class number, explaining their unseeming familiarity with each other. Dietrich offers to go for a drinking bout with Galatea, should they survive this battle with the awakeneds. But she warns Galatea that a drunken fight between the two may result. Galatea is game. Dietrich then lunges down to the fighting below.[83]
Galatea's trump card
During Europa's invasion of the city, Galatea falls back on her emergency plan.[84]
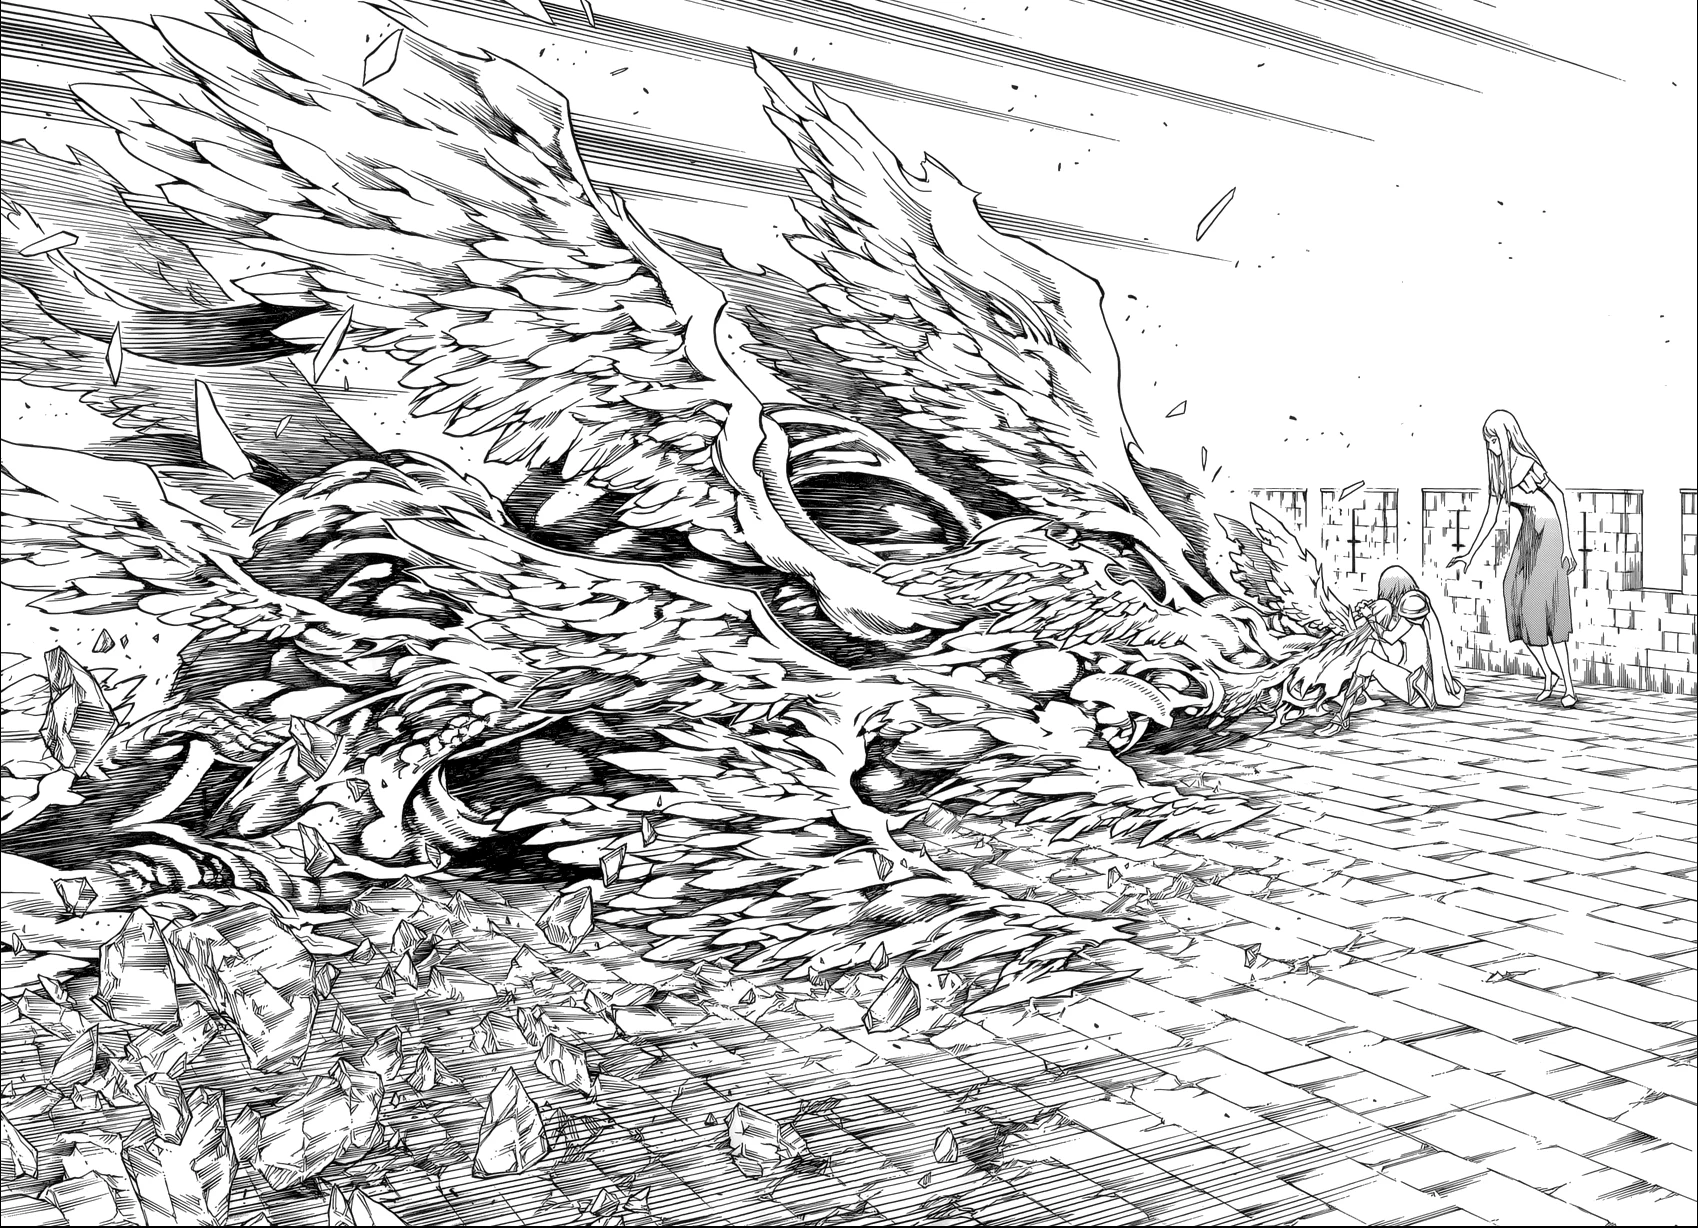
Galatea checks in with Clarice and Miata and confirms they are ready. Galatea instructs Clarice to keep her Yoma energy synchronized with Miata's. Galatea compares their role with Beth, keeping a fully awakened Alicia under control. She offers Clarice a chance to flee the city with Miata, but Clarice wants to stay and protect the people of Rabona.[85] Miata awakens into a sprawling, winged angelic form.[86]
Miata awakens into a feathered form as Galatea and Clarice struggle to hold on to Miata's human consciousness, despite the chaos in Miata's heart. Meanwhile across the city, Europa spots the huge winged body sprouting from the tower. [87]
Diversions
Europa senses Miata's aura as well as those of the two warriors' struggling to align themselves with the near out-of-control energy.[88]
As Europa makes for the tower, the Next Generation warriors run interference. Audrey and Dietrich also divert Europa's attention from the tower, where Galatea and Clarice struggle to contain Miata's mind.[89]
After much fighting, Audrey finally admits her and her comrades' efforts were only a diversion.
Miata ambushes the standing target from behind. Miata has fully awakened into a plumed, multi-winged dragon-worm, her form appearing as an elaboration of the Aztec god Quetzalcoatl.[90]
Round I
Urban warfare
Miata's three wing-like “jaws” fire teeth as if they were Yoma rods. Europa uses her wire saw-like arms to deflect the barrage. When Europa tries to strike, she gets thrown back and crashes into the building roofs below. Miata's counterattack causes the cursing Europa to escape down a street.[91]
The spectators are amazed at Miata's performance. Audrey states that Miata's original power rivaled No. 1s of the past. But she also questions whether or not Galatea and Clarice can really control Miata and bring her back to human form.[92]
In a series of hit-and-run attacks, Europa saws off Miata's wings. When Miata tries to counterattack, Europa bounces away down the narrow streets, ricocheting against the walls and pavement, as if she were a "pinball."[93] Then she attacks Miata again. Rachel and Audrey are dismayed by Europa's street fighting tactics.[94] The entire city has become a sort of pinball playfield for Europa.
Controllers
Atop a tower, Galatea and Clarice try to guide Miata's fully awakened form. Despite that neither of the warriors are twin sisters of Miata, the Controlled Awakening is made possible by Miata's innocence, her mind unfettered with extraneous thoughts. But Galatea realizes they are losing control.
While Galatea is unaffected, each time Miata is damaged by Europa, the damage is transferred to the weaker Clarice, who is bleeding from her eyes. Any further damage to Miata may be terminal for both her and Clarice.[95]
Galatea and Clarice lose control of Miata, who begins to fully awakened. Extreme hunger is overtaking her human self. Her tentacles impale two of the guards and is about to eat them. When Audrey protests, Miata fires a barrage at the rampart.[96]
Europa gloats at the situation and begins to feed on the guards herself. Meanwhile on the tower, Clarice collapses. Back at the rampart, Anastasia and Dietrich try to counterattack, but Europa easily cuts them down.[97]
Confession
Clarice reveals to Galatea that she used to think of herself as special, due to her dark hair. She later found out that she was considered a “failed creation.” Her supervisor Rado told her that such hybrids were disposed of by causing their Yoma energy to run amok. Structurally weaker than successful transplants, Clarice's awakening body would explode.
Meanwhile, Europa feeds on the guards, while Audrey tries to scold Miata out of eating her two guards. At the tower, Galatea watches helplessly as Clarice deliberately awakens, which catches even Miata's attention.[98]
Additional details
Audio
From Claymore Intimate Persona, 反逆 Hangyaku (Rebellion): Galatea—Ai Orikasa 5:04
Video
- French version of Miria, Deneve and Helen challenging Galatea in Alfons
References
Tankōbon Claymore volumes cited are VIZ Media (en-us) editions, unless otherwise noted. Manga scenes (chapters) not yet translated cite Shueisha tankōbon (ja) editions. Manga scenes not yet published in tankōbon form cite Jump SQ (ja) editions. Fragments of Silver Omnibus (総集編 銀の断章 Gin no Danshou) 1–3, Shueisha, are only available in Japanese. Anime scenes (episodes) cited are FUNimation (en-us) editions, unless otherwise noted.
- ↑ Claymore 6, Scene 31, p. 112
- ↑ Claymore 6, Tokyopop, Scene 31, p. 112
- ↑ Claymore 6, Ediciones Glénat España, Scene 31, p. 112
- ↑ Claymore 6, Star Comics, Scene 31, p. 108
- ↑ Claymore 6, Glénat Édition Française, Scene 31, p. 112
- ↑ Claymore, Kazé Anime, Anime Scene 10
- ↑ Claymore 6, Daewon CI, Scene 31, p. 112
- ↑ Claymore 6, Comix-ART, Scene 31, p. 112
- ↑ Claymore 6, Culturecom, Scene 31, p. 112
- ↑ Claymore 6, Ever Glory, Scene 31, p. 112
- ↑ Claymore 15, Shueisha, Scene 78, p. 24
- ↑ Claymore 15, Scene 78, p. 24
- ↑ Claymore 14, Scene 74, p. 24
- ↑ Claymore 14, Shueisha, Scene 74, p. 24
- ↑ Claymore 14, Scene 74, p. 24
- ↑ Claymore 6, Shueisha, Scene 31, p. 112
- ↑ Fragments of Silver Omnibus 3, "Yoma War Record III," p. 731
- ↑ Fragments of Silver Omnibus 2, "Yoma War Record II," p. 689.
- ↑ Fragments of Silver Omnibus 2, "Yoma War Record II," p. 689.
- ↑ Fragments of Silver Omnibus 2, "Yoma War Record II," p. 689.
- ↑ Fragments of Silver Omnibus 2, "Yoma War Record II," p. 689
- ↑ Claymore 8, Scene 44, p. 149
- ↑ Theoi on "Galatea"
- ↑ Fragments of Silver Omnibus 2, "Yoma War Record II," p. 689.
- ↑ Claymore 15, Scene 78, p. 24
- ↑ Jump SQ, June 2013, Claymore, Scene 138, p. 693
- ↑ Claymore 17, Scene 90, p. 15
- ↑ Claymore 17, Shueisha, Scene 90, p. 15
- ↑ Claymore 17, Scene 90, p. 15
- ↑ Claymore 17, Scene 90, p. 15
- ↑ Fragments of Silver Omnibus 2, "Yoma War Record II," p. 689.
- ↑ Fragments of Silver Omnibus 2, "Yoma War Record II," p. 689.
- ↑ Fragments of Silver Omnibus 2, "Yoma War Record II," p. 689.
- ↑ Fragments of Silver Omnibus 2, "Yoma War Record II," p. 689.
- ↑ Jump SQ, August 2013, Claymore, Scene 140, pp. 597–599
- ↑ Fragments of Silver Omnibus 2, "Yoma War Record II," p. 689.
- ↑ Claymore 6, Scene 30, p. 83; Claymore, Anime Scene 11
- ↑ Claymore, Scene 41, p. 42; Claymore, Anime Scene 15
- ↑ Claymore 8, Scene 43, Claymore, p. 132; Claymore, Anime Scene 16
- ↑ Claymore 8, Scene 44, p. 137–156; Claymore, Anime Scene 16
- ↑ Claymore 8, Scene 45, p. 185–187; Claymore, Anime Scene 16
- ↑ Claymore 9, Scene 46, p. 7–18; Claymore, Anime Scene 16
- ↑ Claymore 9, Scene 44, pp. 21–22;Claymore, Anime Scene 16
- ↑ Claymore 9, Scene 46, p. 30–37; Claymore, Anime Scene 16
- ↑ Claymore 9, Scene 46, p. 62; Claymore, Anime Scene 17
- ↑ Claymore 9, Scene 48, pp. 88–89; Claymore, Anime Scene 17
- ↑ Claymore 9, Scene 49, pp. 95–113; Claymore, Anime Scene 17
- ↑ Claymore 9, Scene 49, pp. 121–122; Claymore, Anime Scene 18
- ↑ Claymore 9, Scene 50, pp. 136–139; Claymore, Anime Scene 18
- ↑ Claymore 11, Scene 61, p. 103–106
- ↑ Claymore 13, Scene 72, p. 81
- ↑ Claymore, Anime Scene 24
- ↑ Claymore, Anime Scene 24
- ↑ Claymore, Anime Scene 26
- ↑ Claymore 11, Scene 62, pp. 130–131
- ↑ Claymore 11, Scene 62, p. 144
- ↑ Claymore 11, Scene 62, pp. 144–146
- ↑ Claymore 14, Scene 74, p. 21
- ↑ Claymore 14, Scene 74, pp. 23–25
- ↑ Claymore 14, Scene 75, pp. 63–66
- ↑ Claymore 14, Scene 76, pp. 55–59
- ↑ Claymore 14, Scene 77, p. 124
- ↑ Claymore 14, Scene 77, pp. 126–127
- ↑ Claymore 15, Scene 78, pp. 34–37
- ↑ Claymore 15, Scene 79–Scene 80, pp. 52–77
- ↑ Claymore 15, Scene 80, p. 80
- ↑ Claymore 15, Scene 82, pp. 148–149
- ↑ Claymore 15, Scene 82, pp. 151–155
- ↑ Claymore 17, Scene 90, pp. 9–19
- ↑ Claymore 19, Scene 106, pp. 128–134
- ↑ Claymore 19, Scene 106, pp. 135–139
- ↑ Claymore 20, Scene 108, pp. 10–24
- ↑ Claymore 20, Scene 108, p. 35
- ↑ Claymore 20, Shueisha, Scene 109, p. 50
- ↑ Jump SQ, August 2012, Claymore, Scene 128, pp. 334–337
- ↑ Jump SQ, August 2012, Claymore, Scene 128, pp. 338–341
- ↑ Jump SQ, August 2012, Claymore, Scene 128, pp. 342–343
- ↑ Jump SQ, November 2012, Claymore, Scene 131, pp. 390–391
- ↑ Jump SQ, November 2012, Claymore, Scene 131, pp. 392–395
- ↑ Jump SQ, June 2013, Claymore, Scene 138, pp. 687–690
- ↑ Jump SQ, June 2013, Claymore, Scene 138, p. 691 693
- ↑ Jump SQ, July 2013, Claymore, Scene 139, pp. 838–839
- ↑ Jump SQ, July 2013, Claymore, Scene 139, pp. 840–842
- ↑ Jump SQ, July 2013, Claymore, Scene 139, pp. 842–845
- ↑ Jump SQ, July 2013, Claymore, Scene 139, pp. 845–847
- ↑ Jump SQ, July 2013, Claymore, Scene 139, pp. 848–849
- ↑ Jump SQ, August 2013, Claymore, Scene 140, pp. 597–599
- ↑ Jump SQ, August 2013, Claymore, Scene 140, p. 600
- ↑ Jump SQ, August 2013, Claymore, Scene 140, pp. 601–603
- ↑ Jump SQ, August 2013, Claymore, Scene 140, pp. 611–612
- ↑ Jump SQ, September 2013, Claymore, Scene 141, pp. 712–715
- ↑ Jump SQ, September 2013, Claymore, Scene 141, pp. 716–717
- ↑ A Product of Wasted Time review of Scene 141
- ↑ Jump SQ, September 2013, Claymore, Scene 141, pp. 718–722
- ↑ Jump SQ, September 2013, Claymore, Scene 141, pp. 722–723
- ↑ Jump SQ, September 2013, Claymore, Scene 141, pp. 727–729
- ↑ Jump SQ, September 2013, Claymore, Scene 141, pp. 730–732
- ↑ Jump SQ, September 2013, Claymore, Scene 141, pp. 733–738